vsTASKER 7 User Manual
×
Menu
Index

General

 
General
1

Name

1. Name
Name of the scenario. Must be unique.
 
2

Class

2. Class
In case the scenario inherit from another child class of the main Scenario class, specify that here using ...
User can change the class at any time; the class name will be use at the code generation stage.
 
3

Database

3. Database
Read-only database name, including the path (under /data/db/) where it is stored.
 
4

Reference Time

4. Reference Time
See here.
 
5

Locked

5.
When selected, the scenario will not be modifiable (renaming, adding, moving or removing entities).
 
6

Display Settings

6. Display Settings
Select here what you want to see displayed on the Map or the Environment list.
Some scenarios might be set in such way that the Environment list is kept minimal or that terrain is left empty at design and runtime.
Only the first two options are used for now.
 
7

Active One

7.
Specifies is the current scenario will be the first one to be called at simulation run. If only one scenario defined in the database or if the first scenario of the list must be the first to start, needless to set it true (harmless to do otherwise).
 
8

Standalone Exe

8.
This option tells the code generator to produce a simulation engine that will not wait for the GUI to manually start the simulation (using the button). The Active scenario will be loaded and started as soon as the simulation engine will be run. If Active is not set, the first scenario of the database will be chosen.
 
9

Mute Shared-Mem

9.
If selected, the shared-memory will not be filled by the simulation engine (although the segment will be created). This can accelerate the simulation and will avoid memory buffering if no GUI (reader) is connected to the shared-memory. If this option is selected, the GUI will not be able to monitor the activity.
 
10

Template Editor

10.
Call the editor in order to save the current scenario into the database Templat, as a template scenario.
Same as using the menu Export::Template::Save-as
 
11

Import

11.
Call the importer to load from a file a saved scenario and replace the actual one (including the name). Data/Shared directory is used by default.
 
12

Export

12.
Call the exporter to save the current scenario into an ASCII file (including some references) in order to share it with other players (when cut & paste cannot be used). Data/Shared directory is used by default.
 
13

Demo

13.
Activated and ticked only for demo only scenario, meaning it cannot be modified nor saved.
 
14

Description

14.
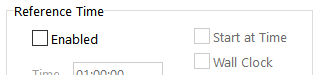
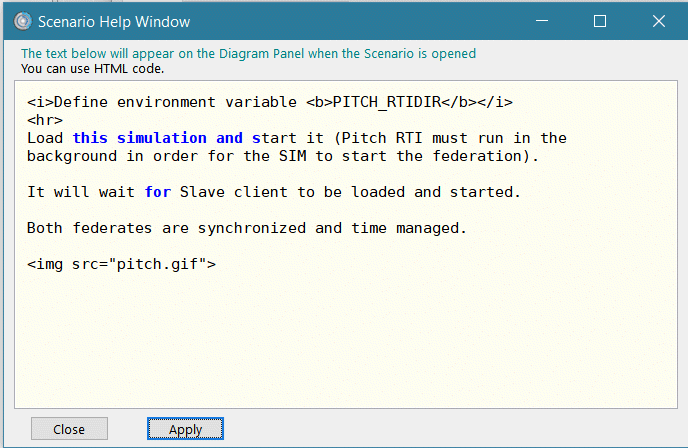
Pop up a new (modal) window for the user to write a description or user guide for the scenario. The result will be displayed on the side panel, as an HTML page, so, content of the description can include HTML tags or even, a copy paste of an HTML page designed in DreamWeaver (for example) :