A Viewer is the shell of the simulation engine that will contain the main loop. The Viewer will create the RTC main node, initialize the simulation, control it and display the output.
When the Viewer targets a specific environment or a graphic engine, it will manage the frequency requirements of the simulation engine as well as the inner requirements of the environment.
A Viewer can be seen as a ready-to-go package, customizable, and provided to the end user as a first integration sample.
When the code is generated from the database, everything is translated into C++ classes and methods, including the user-code. These classes are linked against vsTasker core libraries to produce an executable. For that, a container is requested. This is what we call a Viewer. A Viewer is (and contains) the main of the simulation engine.
By default, the Console is used. The vt_console.cpp is located into runtime/console. It contains the main() function and the call to the entry node (the runtime controller vt_rtc).
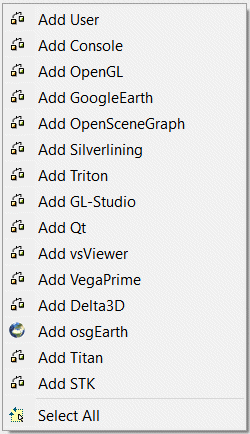
Several Viewers are provided to the user. They are all modifiable as source code is available in runtime directory. The proposed Viewers must be seen as samples or proof of concept. The user is encouraged to rename and enhance these viewers to target their own needs.
Only one viewer can be active at a time.
The code generator will use the viewer setting to add and link with proper libraries.
It is the responsibility of the user to make sure that the selected viewer will support the user-code of the database (Logics, Routines, Reactions, Classes...)
For example, if some logic objects got OpenGL calls (to draw line, explosions, symbols, etc.) during the simulation, it will not be possible to activate and link with a Console viewer; only the OpenGL viewer will work.
But from a Console viewer, it is possible to chose the OpenGL viewer and have a real-time replicated OpenGL window, refreshed at 30hz, similar to the one used for the GUI map (because both items are using the same code, DLL for the GUI, LIB for the simulation engine).
Above are three Viewers added to the Database but only one (Console) is active.
It is mandatory to have at least one Viewer activated.
|
|
A Viewer is not necessarily a graphic engine. It can also embed vsTASKER simulation engine into a Qt application or silently, into another simulation engine. It must be seen as a wrapper.
|

Add a User Viewer. See below.

Add an
STK viewer

Add a
Qt viewer
Right click from the diagram bring the popup menu that replaces the vertical toolbar for viewer creation:
Each viewer code is provided as C++ code in the runtime/ directory. So the user can change and modify any of them. It is recommended to duplicate the files before making any change to avoid losing them when installing a new product update.
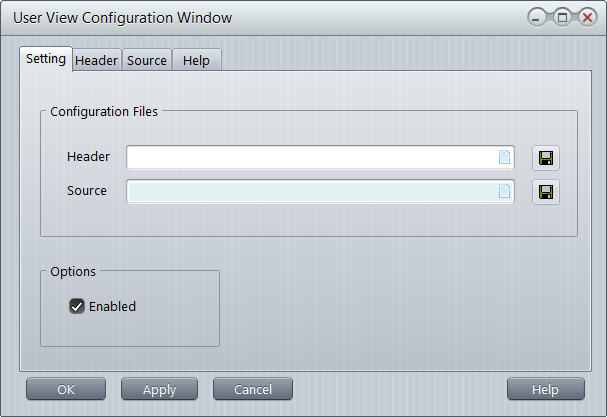
To integrate vsTASKER with a special viewer or even a dedicated shell defined by a pair C++/H files, just select

button on the toolbar and drop it into the diagram area.
Open it and select the and code of your viewer into the appropriate fields:
To create your own viewer, it is a good idea to learn from the given examples. Start with the vt_console_man.cpp basic viewer that shows how to initialize the vsTASKER sim engine (vt_rtc) and advance time step by step. Normally, you should call your own application from within the runtime loop. If your application already has a runtime loop (OpenGL, VegaPrime, game engine loop, etc.) you must initialize vt_rtc before entering the loop then call the tic() function from within the loop, including treating all events. You can see vt_opengl.cpp as an example to start.