If you are upgrading inside a version, you can just overwrite your version with the new installation upgrade (backing up is always a good option).
It is important that you do not change solutions, samples or source/header code provided by the release install as these files are subject to change and your modifications might be lost after an upgrade. It is always advisable to duplicate the source code file you want to change and use the duplicated (renamed) one.
If you do not want to do so, lock the modified file (upgrade will fail overwrite) but you might then experience discrepancy problems and this might just be a work around temporary solution.
We advise not upgrading to major version big projects or projects that are working fine under their actual version. It is always a good idea to start new projects under the latest version of vsTASKER but to keep the current version if the project is working fine, mostly if you added a lot of things around vsTASKER (components, maps, plugins, etc.) Simple database can be easily upgraded but big projects require a more rigorous approach. Keep a list of all files added to vsTASKER directories in order to upgrade cleanly.
If you have version 5 (for i.e.) and want to move to version 6, this is a major upgrade.
We suggest you to keep the version 5 as a backup.
Install the version 6 normally.
You will have in D:/VirtualSim/vsTasker:
Copy from 5/data to 6/data all directories. Skip all duplicated files. This way, you will only add to 6/data your databases and user added data.
Do the same with the following directories:
-
-
-
-
-
-
5/Runtime: copy only the solutions you have changed in
5/Runtime.
|
|
Skip all duplicated files. If later, you find out that some files are missing, you will be able to retrieve them from the 5/ version. If you did modified vsTASKER source code files, a merge will be necessary. There are several tools to do.
|
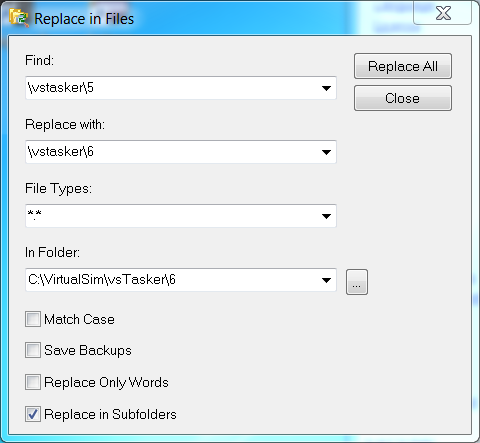
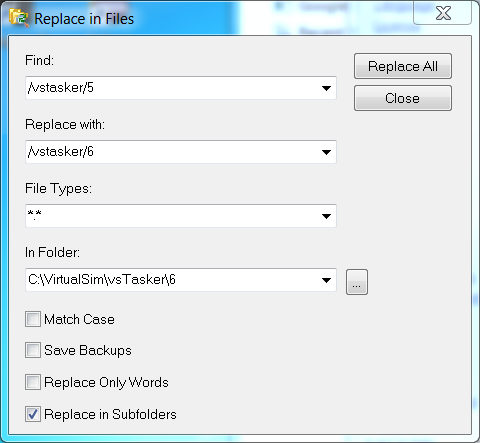
After the copy, it is mandatory to replace string so that references will not link to the previous version.
There is a utility provided into the installation disk that must be used:
ReplaceAll.exe
Start the utility and do the following (make sure you type exactly the same number of characters in Find: and Replace with: Select Subfolders option)
Once the process is done (might take a while - wait that file numbers no more change for 30 seconds), do the following again:
Note that \ has been replaced by / in the two fields Find: and Replace with: !!
You are done. You can now start working with the new version.
Enjoy it !
|
|
If you need to later, copy databases from other older version 5/ or 4/, always do this string replacement on the file or directories you copied.
|