vsTASKER 7 User Manual
×
Menu
Index

Properties

 
Properties
1

Server

1. Server
Select the tile server to be used.
  • Bing (Microsoft) is only supported for the moment.
 
2

Style

2. Style
Select here the kind of map to be used. Not all are available from the selected server.
  • Aerial: satellite picture
  • Aerial + Labels: satellite pictures with some roads and symbols (borders)
  • Roads: road maps
  • Roads + hills: roads maps with terrain elevation shaded
     
3

Tile Size

3. Tile Size
Specify here in pixels the maximum diagonal size of a tile (when zoomed) before it is divided into 4 pieces of higher level of details (LOD).
 
4

Full World

4. Full World
Select this option to force the WebMap server to set the root at level 1, whatever the size of the terrain.
 
5

Hills

5. Hills
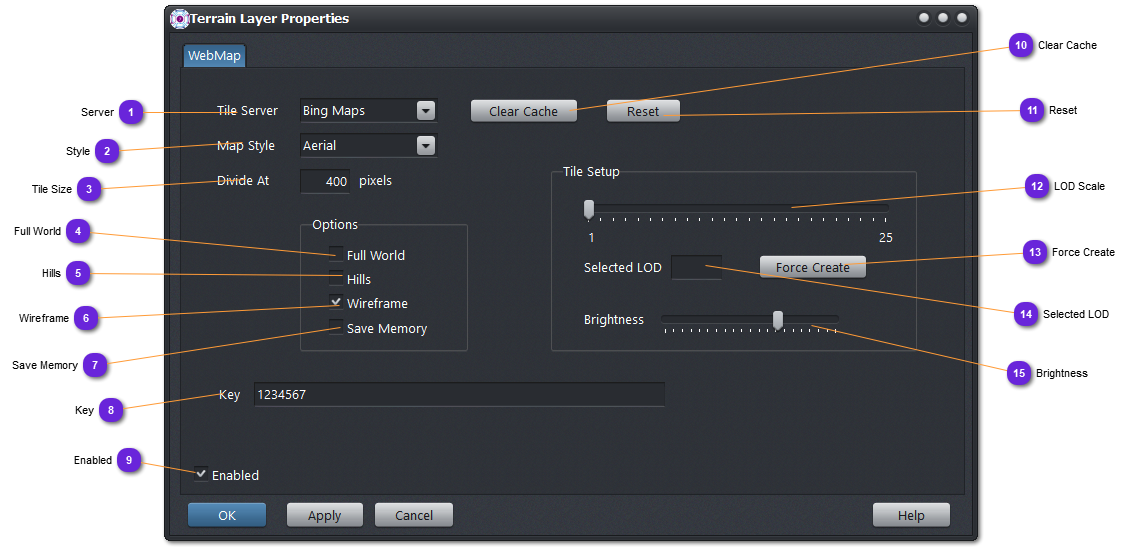
When this option is checked, tiles corners will retrieve elevations from the database terrain (if provided in the layers) and not from the tile provider. Perspective view will be able to show elevation in 3D. All tiles must have the same LOD to avoid artifacts between tiles of different sizes. See Force Create to avoid that.
 
6

Wireframe

6. Wireframe
When checked, displayed tiles are drawn with a magenta border. The tile LOD is mentioned on the lower left corner.
Does not work in perspective view.
7

Save Memory

7. Save Memory
When checked, unloaded tiles (during zoom out or when the tile gets out of view) are freed from the memory and the texture is released.
This saves memory but require reloading the texture each time the associated tile must be created and displayed.
 
8

Key

8. Key
Most tile servers need a registration to track the tile usage. Enter here your own key (provided by the tile server for your account - create one if needed) to avoid the limitation in the number of tiles allowed per IP.
 
9

Enabled

9. Enabled
Enable the Web Maps here. The terrain setting will be used to retrieve the appropriate tiles.
Before enabling the Web Maps, it is better to setup a terrain origin and dimensions properly, using Lat Lon values.
10

Clear Cache

10. Clear Cache
This button will remove all the downloaded tiles from the cache.
Only the cache of the selected server and style is cleared.
You need to change servers and styles and repeat the process to clear all tile files.
Cache can be found in /Data/Map/Servers. In Bing directory (for i.e), you will find one directory for each style (a,r,h...).
In each of these style directories, you will see the LOD sub directories (numbers).
You can manually delete all LOD directories (1,2,3,4..).
Do not remove the _floor.png file !
11

Reset

11. Reset
Force the rebuild of the center node, according to the new terrain setting or if Full World option has been activated or removed.
 
12

LOD Scale

12. LOD Scale
When Web Maps is enabled, according to the terrain dimensions, the LOD of the root tile is given here.
You can use the slider to select a bigger LOD (selecting a lower LOD will have no effect).
 
13

Force Create

13. Force Create
This button will increase the accuracy of all tiles down to the selected LOD.
To reduce the number of tiles to be created (raw estimate is 4^n, with n = selected LOD - root LOD), only the tiles falling into the terrain area will be processed.
 
If you want to have a good and uniform resolution of an area for perspective view, you can first manually setup the terrain dimension for the desired area, uncheck Save Memory (to avoid releasing the hidden tiles), then Force Create the tiling at the specified LOD.
 
Select Hills options and if you have loaded an elevation layer for the same area, tiles will be clamped to terrain surface. In perspective mode, you will see the highest LOD tiles (artifacts will be visible at the border with tiles of lower LOD).
If you think the number of tiles is too high, you will need to kill vsTASKER to abort the process. Do not let it run as it will empty your quota of tiles quickly.
For a world area, LOD 1, trying to Force Create up to LOD 25 will require more than 1125899906842624 files. You do not want that (and your computer neither).
14

Selected LOD

14. Selected LOD
Shows the actual LOD selected by the slider above.
Can also be set manually if the value must be higher than 25.
 
15

Brightness

15. Brightness
Set the overall brightness of the raster map or tiles. Left is dark, right is full bright.