Meshes
Meshes are rectangular grid that are dropped on the terrain in order to manually cover some areas with specific elements.
Several meshes of different types, size and density can be used on the same terrain.
They can overlap although the component working with them can conflict if two Meshes of the same type are overlapping.
A Mesh can be seen as a matrix of nodes.
There is two kind of meshes
: contains nodes that holds special tags to describe the mesh and drive the path following algorithm.
: contains nodes that holds list of entities belonging to the node area. This mesh is for runtime only.
To access this layer, depress the following Meshes button:
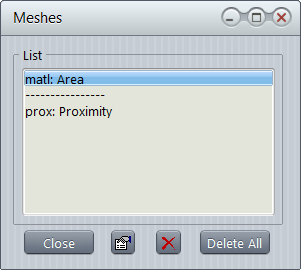
Double click the background to list all defined meshes.
Each node is linked with the surrounding ones using pointers, to speed up the traversing of the mesh.
A node holds some user values.
Three predefined nodes are provided:
: used by PathFinding component. Can hold any of the following tags:
: proximity node, used for entity collision and to speed up the detection algorithm with thousands of entities. Used by Proximate component.
: can hold any data user want to drop into the node. Specific component must be written to handle such mesh.
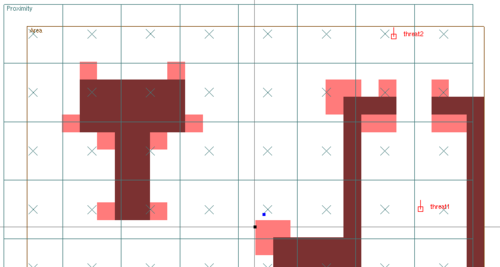
 When a mesh is selected, the distance string is used to initiate the path finding algorithm between the two extremities. A default cost function is taken, penalizing the diagonal moves.
 Creates a new mesh. Cursor changes to
  . Set the top-left corner of the mesh, depress mouse button, hold it and move the mouse to the bottom-right corner of the mesh.
 Release the mouse button and set the property window.
When a mesh is selected, use the following tool to paint the mesh with tags:
 Clears the content of the node. Material mesh only.
 Set the node tag to a blocking wall (cannot pass). Material mesh only.
 Set the node tag to walkway. A walkway is always preferred over a cleared node. Material mesh only.
 Set the node tag to no walk tag. The path following algorithm will give a high cost to this node. Not blocking if no other way. Material mesh only.
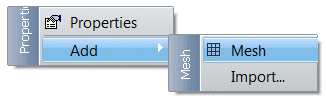
Right click the background to add a mesh:
: add a new mesh layer
: import from /data/shared directory a previously exported mesh.
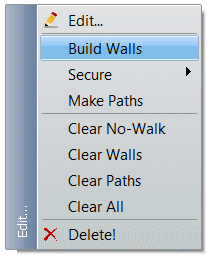
Right click any selected mesh to display the popup menu:
: automatically scan the terrain below the mesh and add walls wherever the slope or height delta is above the threshold Auto Wall defined in the mesh settings.
: : add a no walk tag at wall corners only; : add no walk tags around all walls (see Wall Coat in mesh settings).
: try to build walkways between walls to avoid path finding to raze walls.
: remove all no walk tags from the mesh.
: remove all wall tags from the mesh.
: remove all walkway tags from the mesh.
: remove all tags from the mesh.
: remove the mesh from the scenario.