vsTASKER 7 User Manual
×
Menu
Index

Properties

 
Properties
1

Name

1. Name
Unique name of the special zone.
 
2

Shapes

2. Shapes
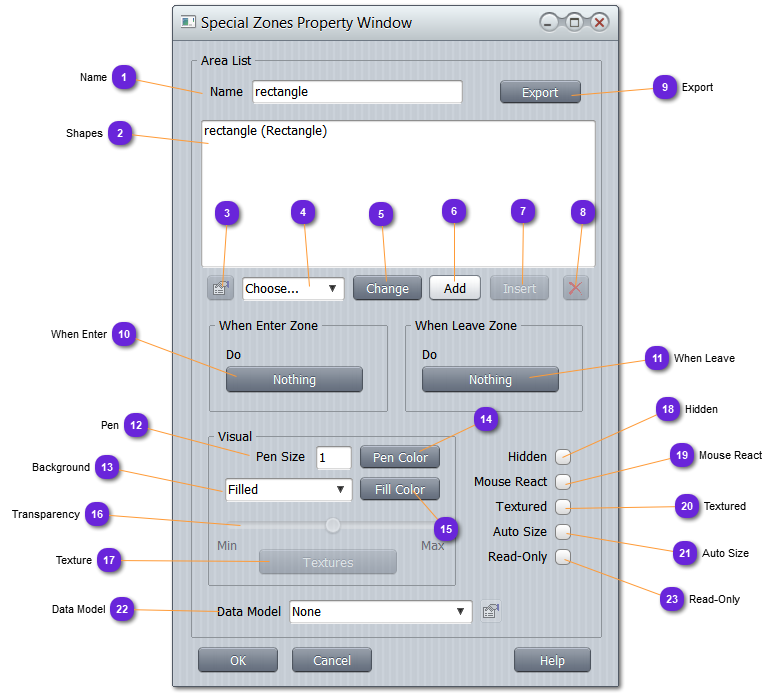
List of all the areas (shapes) defining the special zone.
For example, a sand region can be made of several shapes distributed on the terrain. Gathering several shapes into a unique zone will faster the processing of such zone as only one component will be needed. It also can make sense to combine different types of areas into the same zone, if the purpose is to avoid them.
 
3

Properties

3.
Open the property window of the selected area (see Circle, Rectangle, Polygon or Segment).
Areas are processed and drawn from top to bottom.
4

Shape Type

4.
Select the shape type from the list (to be used with Change, Add and Insert)
 
5

Change

5.
Change the shape of the selected area with the drop down shape selector (4)
 
6

Add

6.
Add a new area of the selected shape (4) at the end of the list.
 
7

Insert

7.
Insert a new area of the selected shape (4) after the selected area in the list.
 
8

Delete

8.
Remove the selected area from the zone list.
 
9

Export

9. Export
Special zones can be exported to /data/shared for later reuse (through import function)
 
10

When Enter

10. When Enter
Set here the event to be triggered when an entity enters any areas of the zone.
This behavior must be handled by the SpecialZone component.
 
11

When Leave

11. When Leave
Set here the event to be triggered when an entity leaves any areas of the zone.
This behavior must be handled by the SpecialZone component.
 
12

Pen

12. Pen
Specify here the thickness of the area shape outline when drawn on the map.
Use 0 to remove the outline frame.
 
13

Background

13. Background
Specify is the area must be filled or just outlined.
  • Empty: no filling
  • Filled: opaque filling
  • Transparent: transparent filling
 
14

Pen Color

14.
Color used to draw the outline of the areas.
 
15

Fill Color

15.
Color used to fill the area shape.
 
16

Transparency

16. Transparency
When the filling is set to Transparent, use this scroll bar to set the transparency level from Min (full opacity) to Max (invisible)
 
17

Texture

17. Texture
Select the file that will be used to texture the area shapes. Textured check box (20) must be checked.
Supported types: TGA, JPEG, PNG.
18

Hidden

18. Hidden
Check this option to hide the zone (all areas) from the scenario map, when Feature layer not selected.
Hidden features are always visible when the Feature layer is selected.
19

Mouse React

19. Mouse React
The special zone will trigger the event when the mouse enters and leaves areas.
 
20

Textured

20. Textured
When textured, the file (17) will be used and the filling setting will be skipped.
 
21

Auto Size

21. Auto Size
When checked, the size of each defined areas will be resized according to the width and height of the loaded texture file.
 
22

Data Model

22. Data Model
If a data model must be associated with the special zone (to get extra settings or give specific data to the user code), select it from the drop down list.
To set or change the parameters (interface) of the data model, use the button.
For example, a special zone might represent a mine field. User can then create a data model named MineField with all kind of data some other components or logics might need to process. Using the data model attachment capability, user will be able to specialize any zone of his scenario.
 
23

Read-Only

23. Read-Only
Check this option so that the user will not be able to move or reshape the special zone.